How to Build a Shopify App - The Easy Way
When I first started researching how to create Shopify apps, I stumbled across many articles and YouTube videos, all of which had a completely different way of doing it.
At this point, I didn't really understand what a Shopify app even was!
I thought that a Shopify app was somehow native to the Shopify platform and written in it's own language, similar to how it is with a desktop app or a phone app.
Turns out, I was dead wrong.
A Shopify App is just a web app that connects to a Shopify store.
That's it.
When you realise that a Shopify App is just like any web app, you start to understand that a Shopify App can be written in several different programming languages across many different stacks and that's when you realise that the skills you would use to create any web app are the same for building a Shopify app.
The difference between a Shopify app and a regular web app is really the use of Shopify's Admin API and that's what we'll be focusing on in the following article.
What exactly is a Shopify App?
Given that a Shopify app is simply a web app that connects to a Shopify store, we can now see why there are so many different tutorials on creating apps using many different programming languages and frameworks.
In this tutorial, I'll be using Node.js with Koa but regardless of what tech stack you want to use, the main lesson I want you to take from this article is the understanding of what actually makes an app a Shopify app.
The following are the 3 important points to keep in mind when creating your first app.
1. Shopify Apps must be authorised by a store
Before your app can be deemed a 'Shopify App', it will need to be registered and authorised.
This is set up in the dashboard of your partners account.
You can think of this almost like 'registering' your app.
Despite the wording, this process doesn't actually create any application. Instead, it simply lists the app in your partner account and provides you with an API key and API secret key to include in your app for authorisation.
In order to make this work, you'll need a public address for your app.
2. Shopify Apps must be hosted somewhere
When you create an app in your Shopify Partners account, you might be forgiven for thinking that Shopify will host your app for you - nup!
Instead, you'll need a public address for your app to be accessed and then you'll submit that to Shopify via the interface pictured above.
Once you're ready to deploy your app, you can use a service like Heroku to host it but during development, it is essential that you can run your app locally.
So how are you able to provide a public address to Shopify?
The answer is to use a tunnelling service and the go-to solution is called ngrok.
Ngrok is a simple application that exposes a localhost address to a public address on the internet.
Here's what it looks like:
As mentioned, this is just for while developing your app. Once the app is ready to go live, you'll want to deploy it to a proper host and update the address of the app in your partners account.
3. Shopify Apps must use a Shopify API
The third and final concept that's important to understand when creating Shopify apps is the use of the right Shopify API. Usually, this API will be the Admin API.
The Admin API allows you to both read and write data from your store. Essentially, it provides an interface to all the functions within your store admin.
There is however one other API worth mentioning, which is the Storefront API.
As is written on Shopify's website:
In contrast with the Admin API, which enables developers to build apps around merchant-facing actions (such as shipping and fulfillment), the Storefront API focuses on shopping experiences seen from the customer perspective.
In other words, the Storefront API provides access to data that's already publicly available to your storefront whereas the Admin API gives you access to all the data and functions that you as a store admin would have.
Most of the time, when you hear someone talk about a 'Shopify App', they are referring to an app that you access through your admin and therefore uses the Admin API.
The Storefront API on the other hand, is more for creating custom storefronts like the one I created here.
Inevitably, you will need to use a Shopify API in your application. Otherwise, can it really be considered a 'Shopify App'?
Creating your first Shopify App
Now that we've established a broad understanding of how Shopify apps work, let's go ahead and create our first app.
1. Choose a tech stack
As mentioned, Shopify apps are self-hosted and the APIs are programming-language agnostic (meaning it doesn't matter what language you use). Therefore, you'll need to make a decision on what tech stack to use.
In my opinion, the best two options for your choice of programming languages are either
- Javascript, or
- Ruby
Why?
Well, these two languages are the ones that Shopify seems to support the most. They are the only two languages currently supported by the Shopify App Cli and Shopify provides authentication packages for both Node.Js and Ruby.
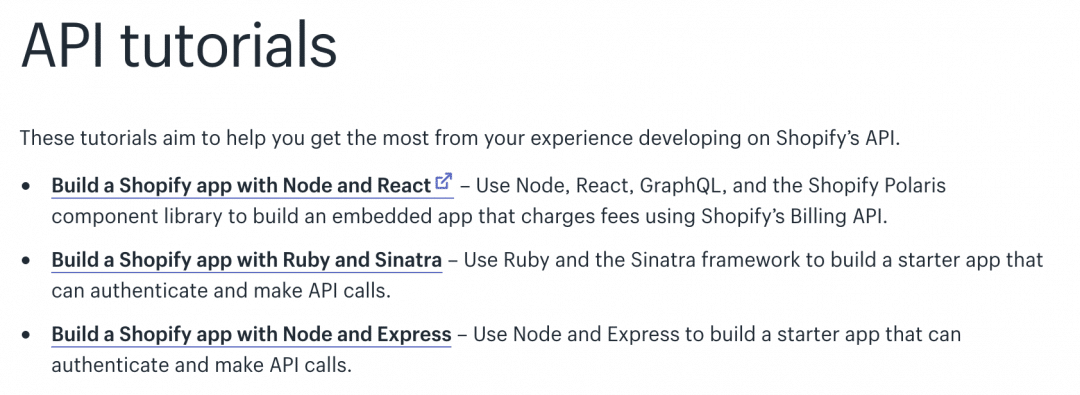
As you can see from the above screenshot, two of the tutorials currently offered by Shopify are using Node and one is using Ruby.
If any of these tutorials describe the exact tech stack you wish to use then feel free to check them out and follow along. For me however, I wanted to use Node.js but with a Vue.js front-end (as apposed to React).
The trickiest part that I've found with Shopify app development is the authentication part. That's why I decided to use Koa.js as my Javascript framework of choice as Shopify provides a package called shopify-koa-auth and shows you how to use it in their tutorial, "How to Authenticate Your Embedded App in the Shopify Admin".
2. Authenticate your app
Speaking of authentication, you'll need to make sure that you can successfully connect your app to a Shopify store before you can realistically start any development.
As mentioned, understanding how Shopify handles authentication can be tricky business which is why I decided to follow this article on Shopify's Web Design and Development blog. However, If you would like to go deep into understanding how authentication works at Shopify, they have a large section of their docs dedicated to it here.
In my opinion, authenticating your app is not something you should spend a long time on as it's simply a one-time thing to get your app to work. That's why I stripped down my app into a basic framework I call shopify-koa-server.
shopify-koa-server provides all the code necessary to spin up and authenticate a Shopify app. You just need to add your API credentials to the .env file to authenticate. Then, you can add a front-end framework that compiles to the public folder and add routes to your application in the server folder.
If you want to follow along, download the repository from Github and run npm install to install the dependancies.
In order to authenticate the app, you'll need
- A tunnelling address to register in your Shopify partners account, and
- An API key and API secret key to submit in your request to authenticate
2.1. Set up your tunnelling address
In order to 'create an app' in your Shopify partners account and receive the necessary API keys, you'll need a public address for your application. As previously mentioned, an easy way to do this is with a tunnelling service like ngrok.
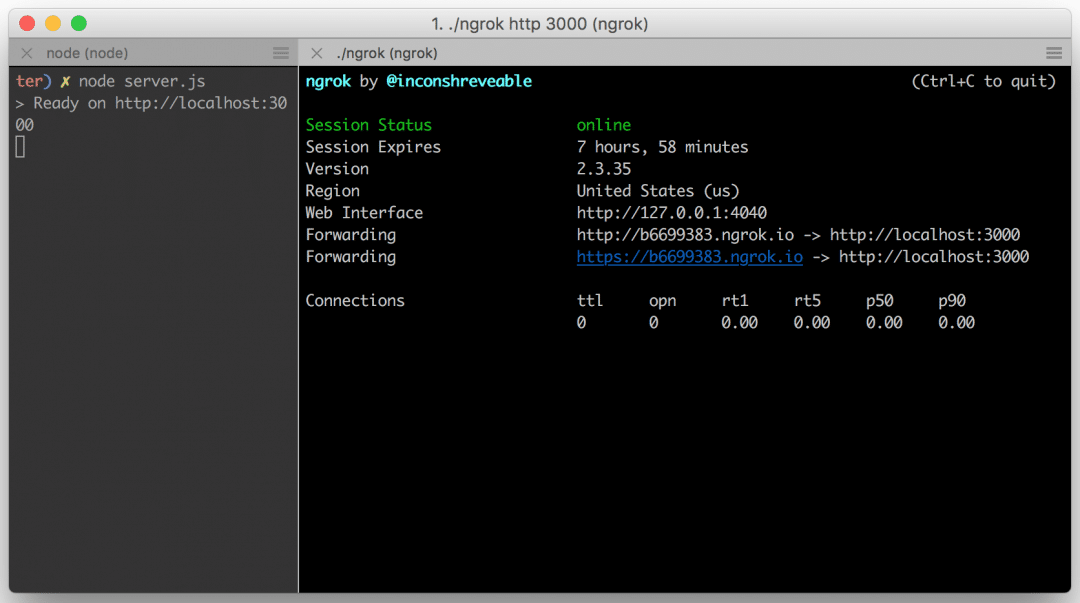
In the server.js file contained in the repo, the port has been set to 3000 which means that your app will run at localhost:3000. This is the address to which you want to create your tunnel to.
In order to run the tunnel, head to ngrok's website, download the application and then run the application from your command-line tool using the command ngrok http 3000.
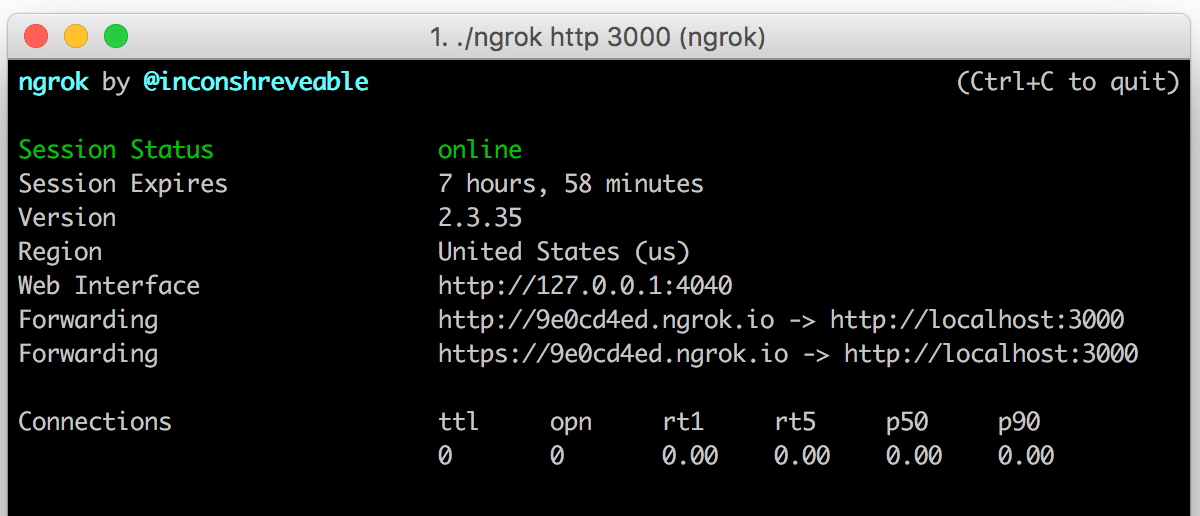
As you can see from the above screenshot, ngrok has created two tunnelling addresses to localhost:3000, one is using the http protocol and the other is using the secure equivalent, https. In the next step when you register your app in your Shopify Partners dashboard, you'll copy across the second (https) ngrok address.
Make sure that you keep this window open during development and when you're done, make sure to end the session (using Ctrl+C on Mac) before closing.
Note that the forwarding address is only valid while the app is running. Each time you restart the session, you'll be presented with a new public address and therefore, you'll have to update the address in the app setup on Shopify Partners.
2.2. 'Register' your app
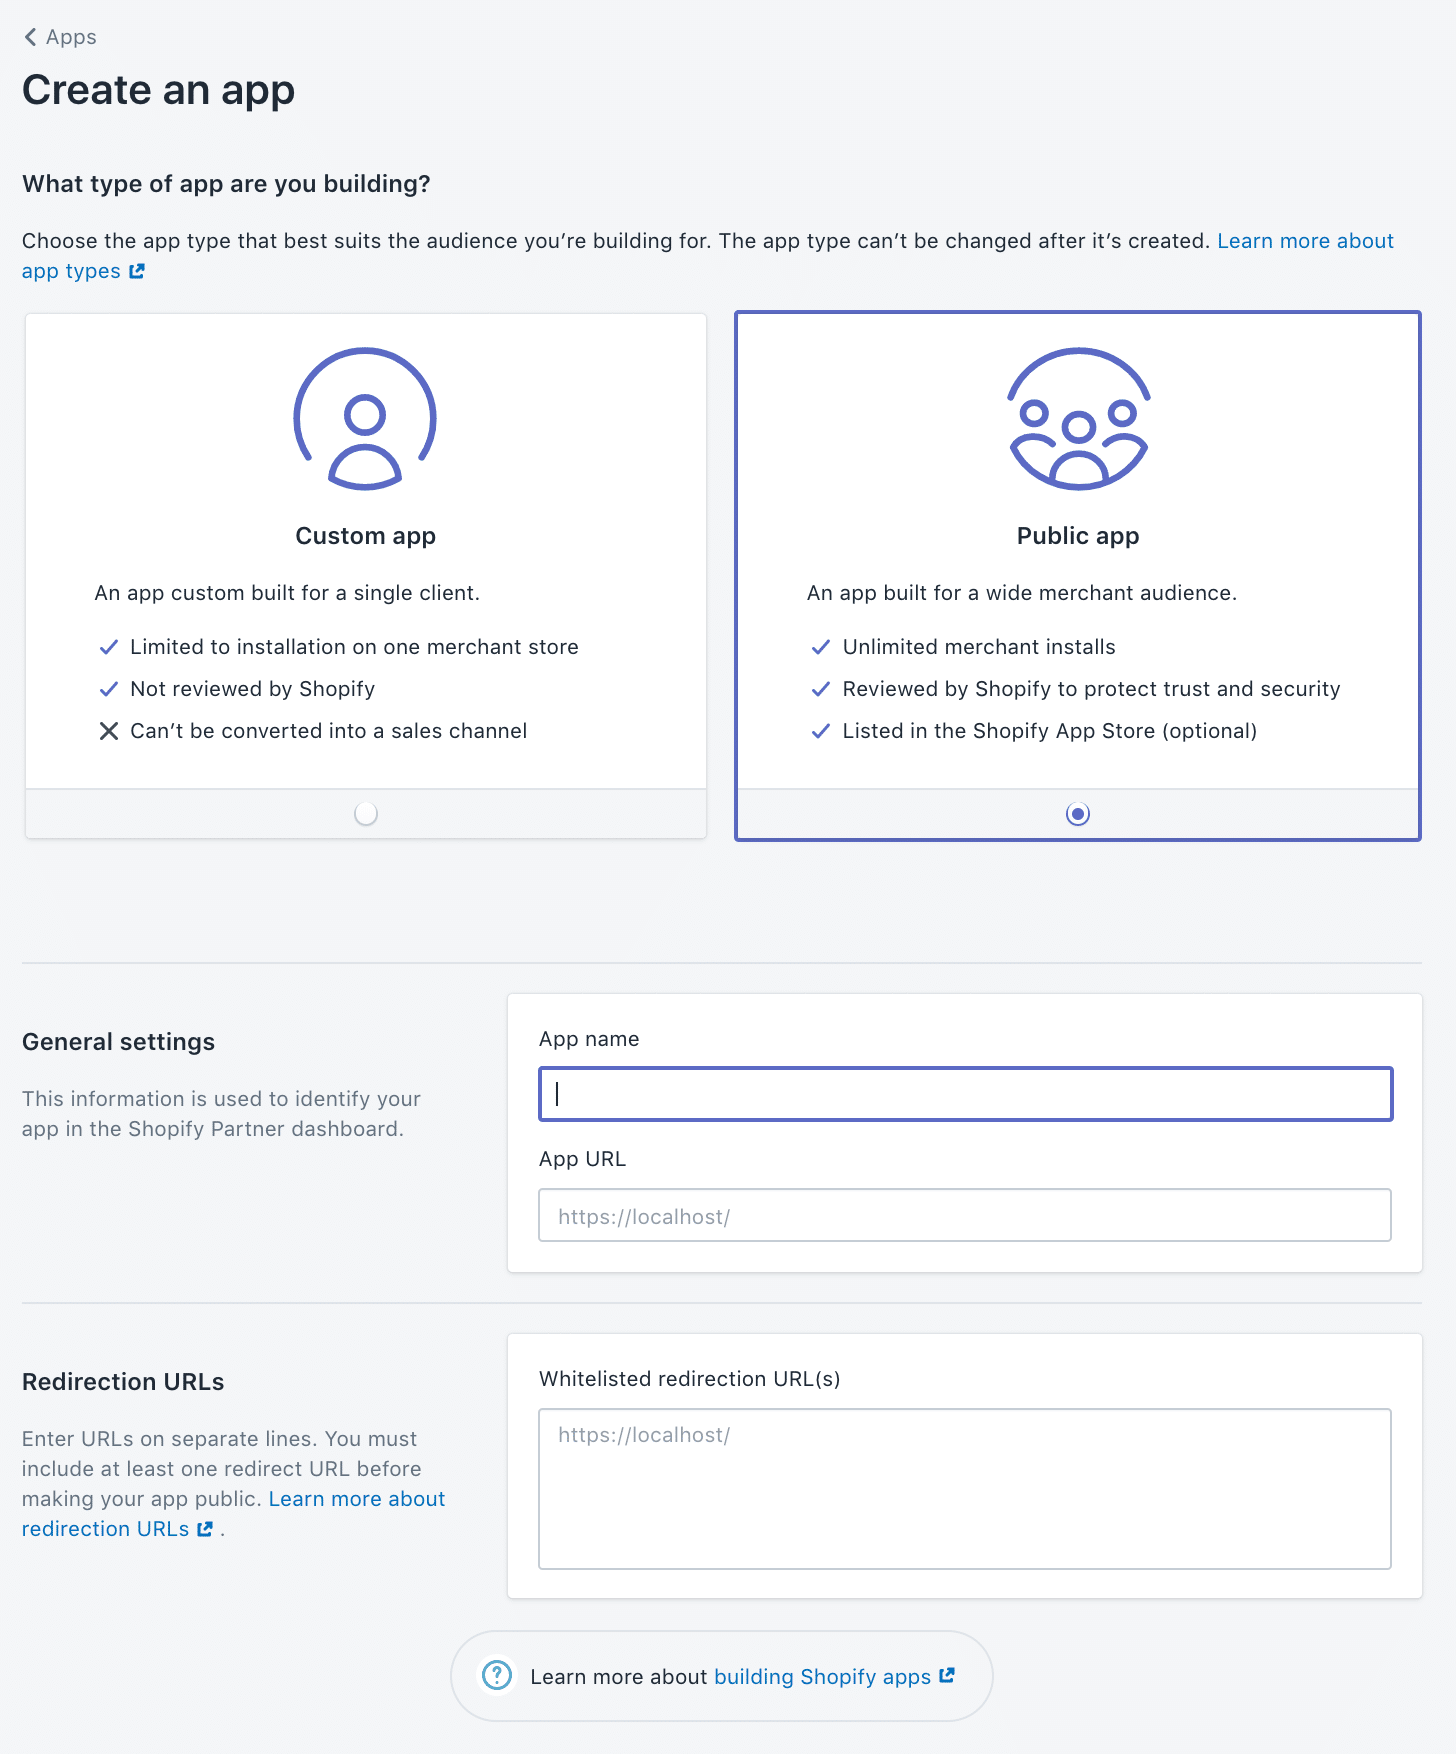
Now that you have a public address for your app, you can now 'create' it in your Shopify Partners account by clicking on 'Apps' in your sidebar and then clicking the 'Create app' button.
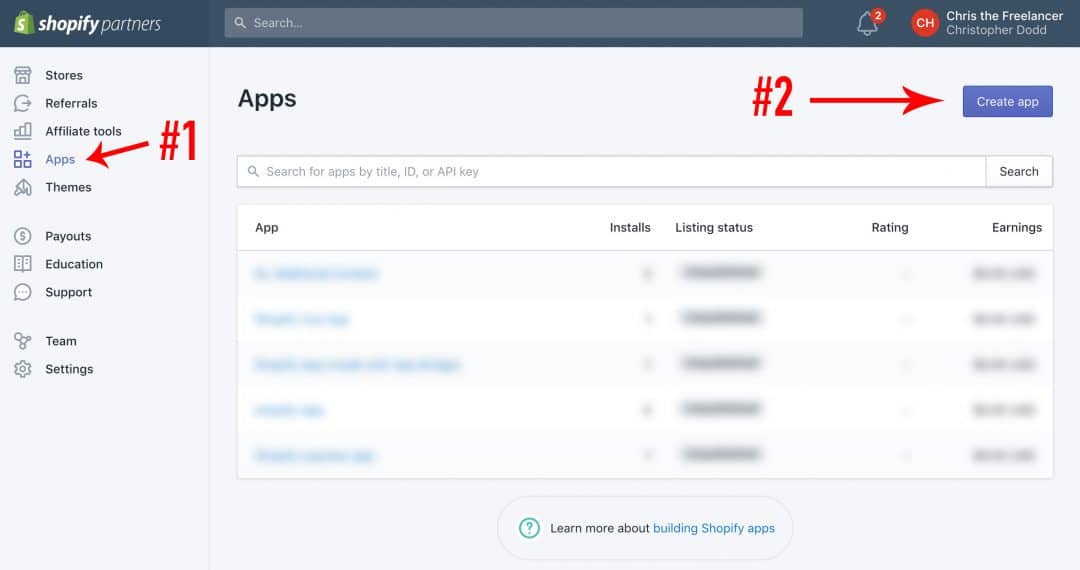
As I mentioned, I think the use of the word 'create' is a little bit misleading here so I like to refer to this step as 'Registering your app'.
After clicking 'Create app', select 'Public app' for your app type and in the App URL field of the form, insert the https address from the previous step.
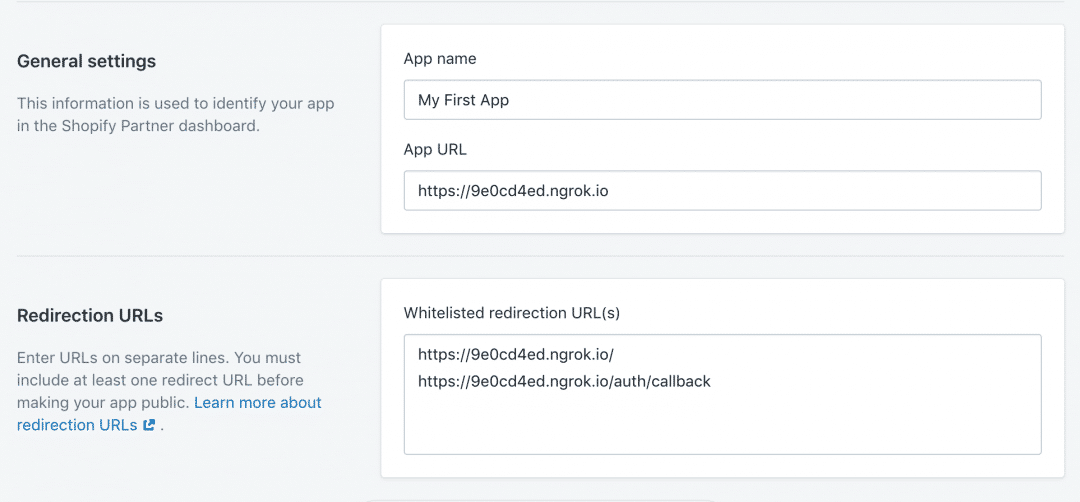
In the 'Whitelisted redirection URL(s)' field, insert the http address again and then the same address but with /auth/callback on the end (as can be seen in the above screenshot).
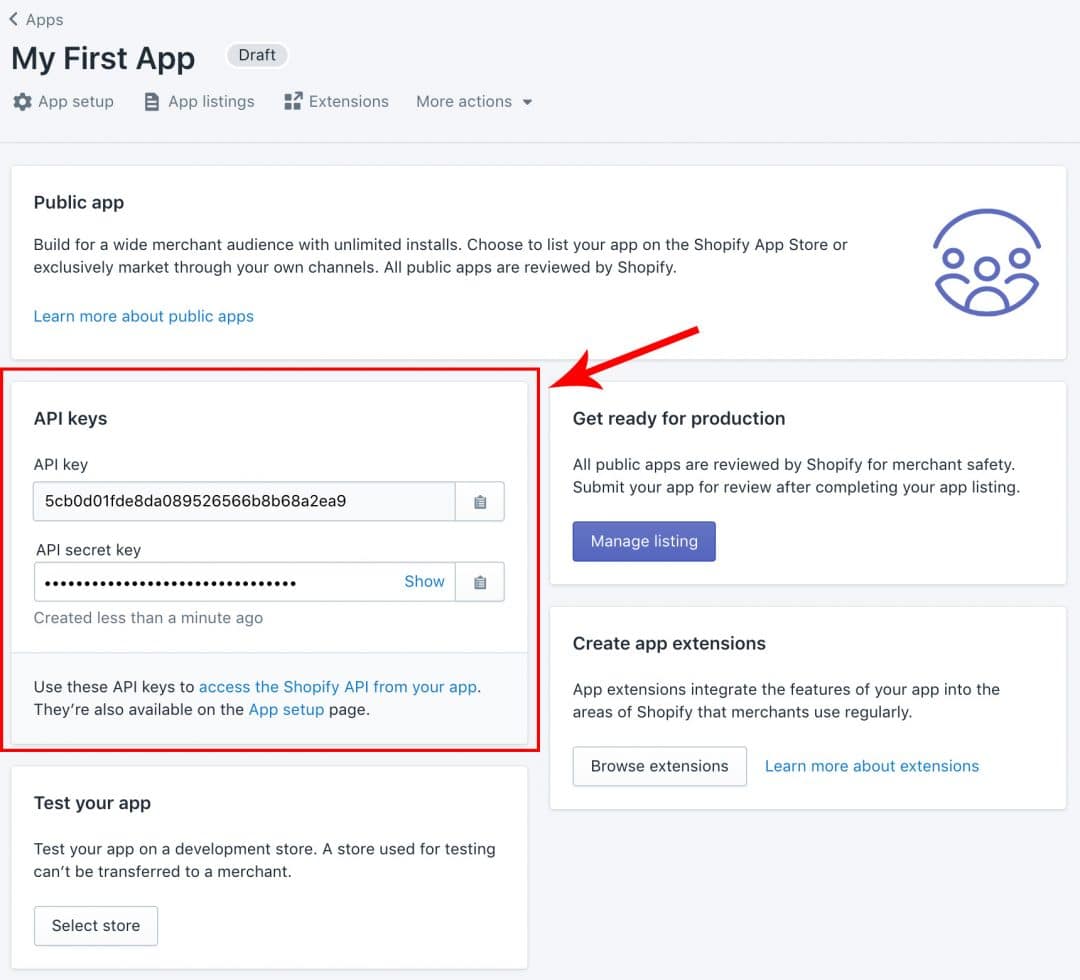
Scroll up to the top of the page and click 'Create App' to complete the process.
On the next screen, you'll now be presented with your API keys.
We're now almost ready to run our app.
The next step is to take your API keys, insert them into the variables contained in the .env file of your app and run your app via the command line using the command node server.js.

With your app now running at localhost:3000 and the your ngrok tunnel forwarding to that address, you should now be able to install your app onto a store.
Up until recently, Shopify allowed you to install an app on any store by using a special url but this now appears to no longer work.
Instead, you'll need to head back into your Shopify partners account and click the 'Select store' button in the 'Test your app' panel of your app screen.
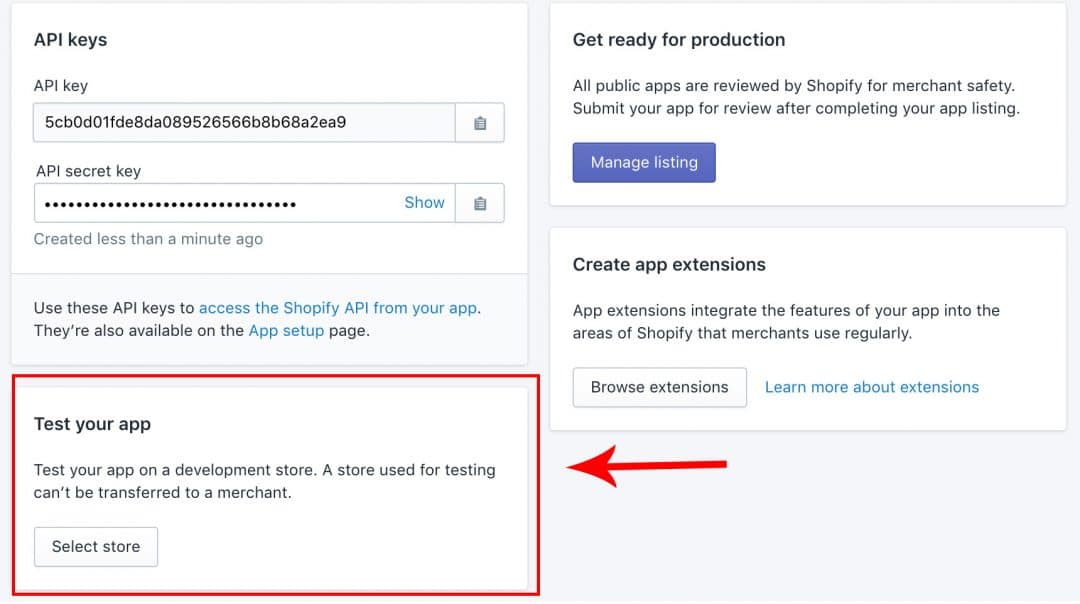
On the next screen you'll be able to select the store on which you want to install the app but under two conditions.
- The store has to be a development store associated with your partner account, and
- The store that you install the app on will be permanently prevented from being transferred
Due to that second point, you'll want the development store you install the app on to be purely for testing purposes.
If you're developing a store for a client for instance, you won't want to install your app on that store. Instead, if you do need a store to work on your app, create a fresh development store that you don't intend on ever using as a real store.
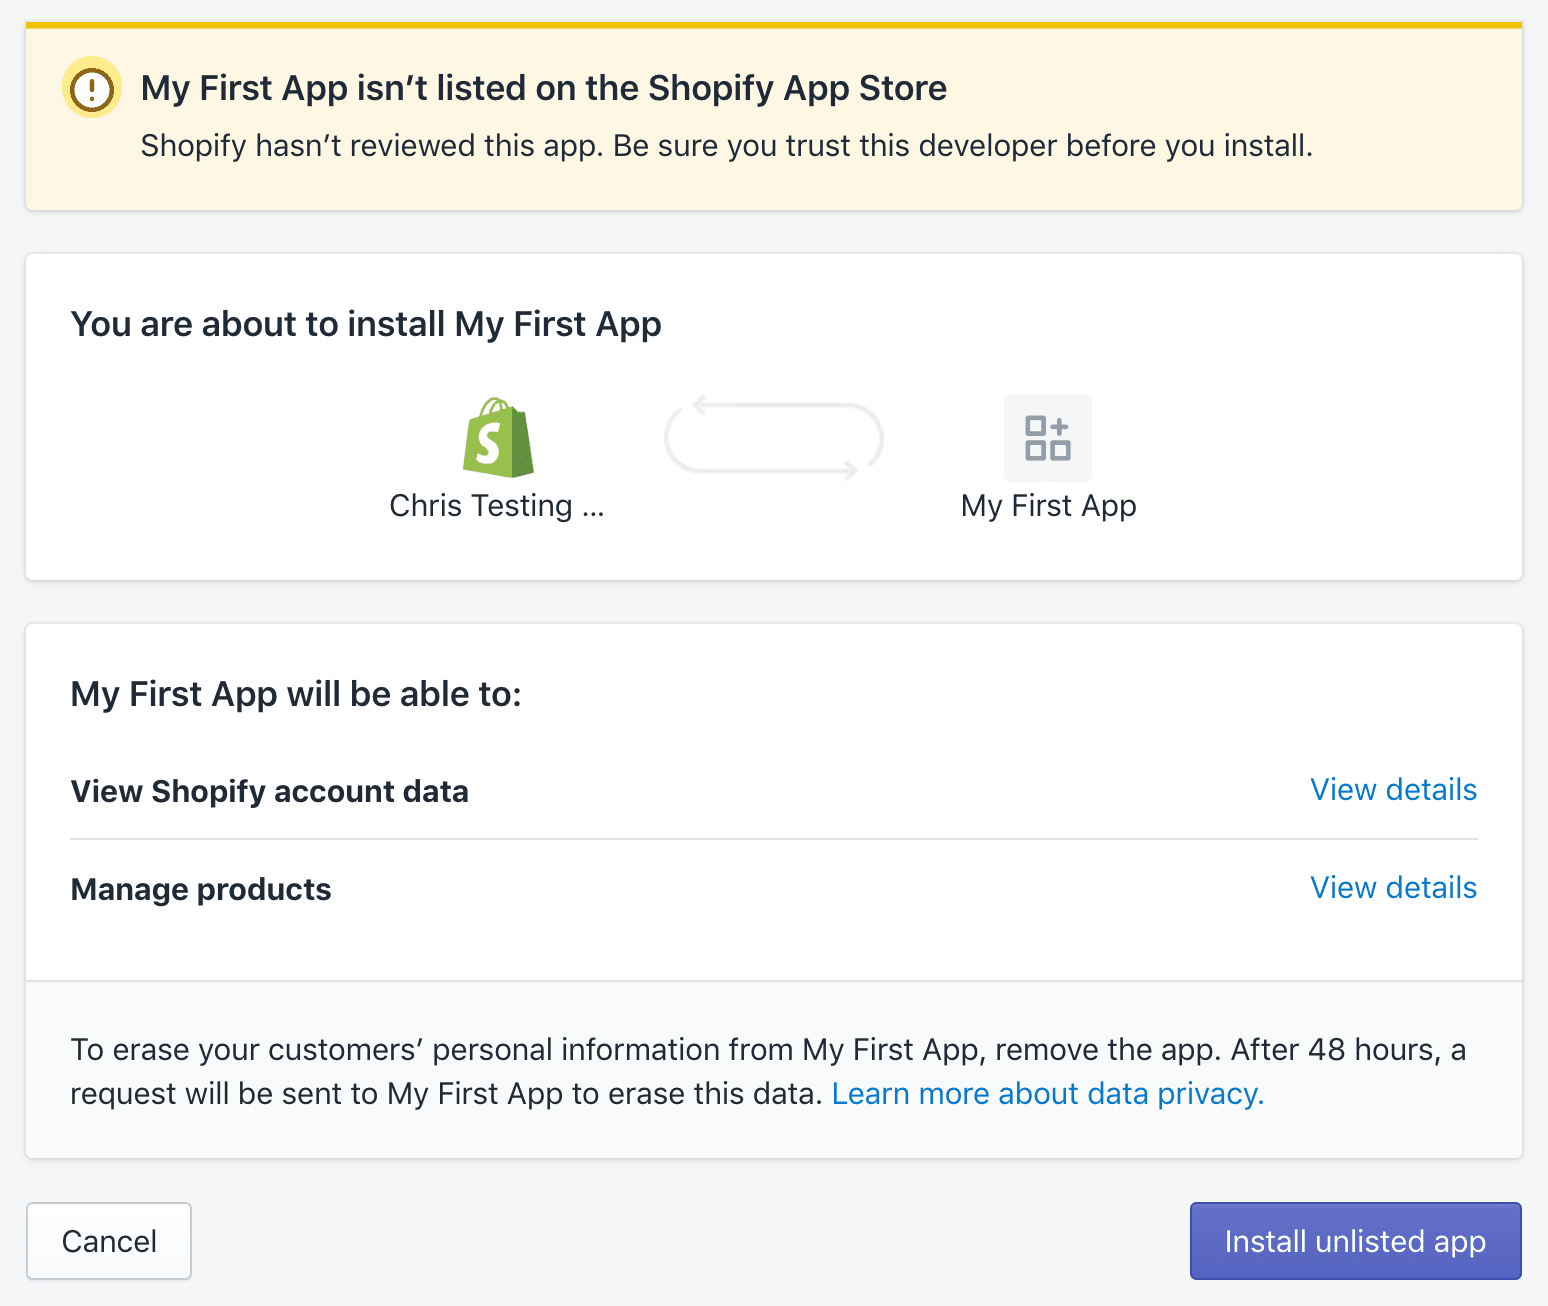
Once you confirm acknowledgement that store transfer will be disabled, you'll be taken to the standard app authorisation page where you click 'Install unlisted app' to complete the process.
3. Build your app
Congratulations! You now have your very own Shopify app!
But there's a big problem - your app doesn't actually do anything yet.
What you now need is to write some queries, mutations and routes into your app.
Luckily, I have started the process for you.
Understanding your app structure
While the server.js file represents the core of your application, the files in the server folder are the recommended location for building out the backend of your app.
Inside the server folder you have 4 files:
apiClient.js- This file is already set up with a simple function that uses the popular http client Axios to provide an easy way to query the API.routes.js- This file is where you will create routes for your application. Backend routes are required within your app as the Admin API won't accept client-side requests.queries.js- This is where you write your queries for the GraphQL version of the Admin API. These 'queries' will be responsible for accessing data from your store.mutations.js- This is where you write your mutations. Mutations are just like queries except that they modify store data rather than just retrieving it.
It's also worth mentioning the public folder where the front-end code for you application resides. Currently it contains a single file index.html but it's recommended that you use a front-end framework (like React, Vue or Angular) and set it to build to this folder.
3.1. Write your first query
Now it's time to make your app a true Shopify app by bringing in some store data and the first step is writing an API query.
The endpoint, headers and other settings have already been included in the graphQLClient function so it's now just a matter of using that function to submit a query to the API.
Unfortunately, there's not enough time in this article to go over the whole language of GraphQL but the basic idea behind it is that you send a POST request to a single endpoint with the exact data you wish to access and the API returns only that data.
Let's take a look at an example:
// server/queries.js
const { graphQLClient } = require('./apiClient.js');
module.exports = {
// Returns a list of products
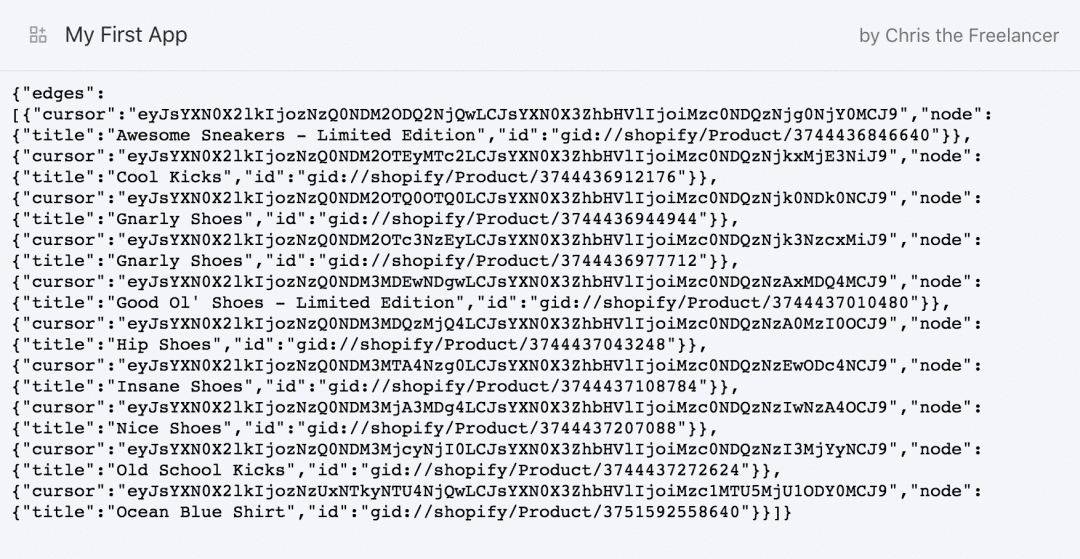
getProducts(auth) {
const query = `{ products(first: 10) { edges { node { title id } } } }`;
return graphQLClient(query, auth);
}
}On line 1, the graphQLClient function is imported from apiClient.js. We use this on line 18 to combine the query with the other settings and create a new function called getProducts.
Inside getProducts you have the query itself which returns the title and id of the first 10 products in the connected Shopify store.
If you're confused by the words edges and nodes, don't worry. I too was oblivious to why these existed but it turns out it's due to how pagination works in GraphQL.
Again, not enough time to go into GraphQL in this tutorial but it should make sense once you learn the language.
As you can see from the code snippet above, the getProducts function takes a single argument, the auth object which we will pass through when we create the route for this query.
3.2. Write your first route
As previously mentioned, the Admin API won't accept client-side API requests which means we need to pass the data through a backend route in our app in order to make it available to our front end.
// server/routes.js
const Router = require('koa-router');
const router = new Router();
const parse = require('co-body');
const { getProducts } = require('./queries.js');
const prepareAuth = (ctx) => {
	const accessToken = ctx.cookies.get("accessToken");
    const shopOrigin = ctx.cookies.get("shopOrigin");
    return { token: accessToken, shop: shopOrigin }
};
// Create the 'products' route
router.get('/products/', async (ctx) => {
	const auth = prepareAuth(ctx);
	await getProducts(auth).then(response => ctx.body = response.data.data.products);
});
module.exports = { router }
On line 5, we import the getProducts function into our routes file and use it inside our route definition on line 21.
To create a route in Koa (using the koa-router middleware), we use the method get on the router object with two arguments. The first argument is the route address and the second is the callback function.
Inside the callback function, you can prepare the auth object by using the already made prepareAuth function and pass it to getProducts which will return a promise.
The .then method then handles the response and returns the required data nested within the response.
This might all seem a bit redundant as we're essentially creating our own API on top of the Admin API but as the API won't accept client-side requests, this is a necessary step.
3.3. Use the data
Now that we have our route set up, we can simply add the route address (/products/) to the address bar in our browser and access the data we requested in step 1 (assuming no errors).
Ok great! Now we have access to our data but it doesn't look very user-friendly now does it?
This is where your front-end framework comes in.
For my own app, I used a framework called Vue.js but that is of course, a big topic in and of itself.
For the purposes of this tutorial, let's use a library most front-end developers should be familiar with, jQuery.
Create the the following javascript file in your public folder.
$(document).ready(() => {
	const $productDiv = $('#products');
    $.get('/products/').then(response => {
    	let template = `<ul class="Polaris-ResourceList">`;
        $.each(response.edges, function(i, edge) {
        	template += `<li class="Polaris-ResourceList__ItemWrapper"> <div class="Polaris-ResourceItem Polaris-ResourceItem--persistActions"> <a class="Polaris-ResourceItem__Link" data-polaris-unstyled="true"></a> <div class="Polaris-ResourceItem__Container"> <div class="Polaris-ResourceItem__Content"> <h3><span class="Polaris-TextStyle--variationStrong">${edge.node.title}</span></h3> </div> </div> </div> </li>`;
       });
       template += `</ul>`; $productDiv.append(template);
   });
});
Then in your index.html file, create a div with the id of products, import jQuery and your newly created Javascript file.
Oh, and to make it look a little nicer, let's remove the <h1> altogether - great!
Now, save your file, restart your server and head to the root of your application (ie. remove /products from the address).
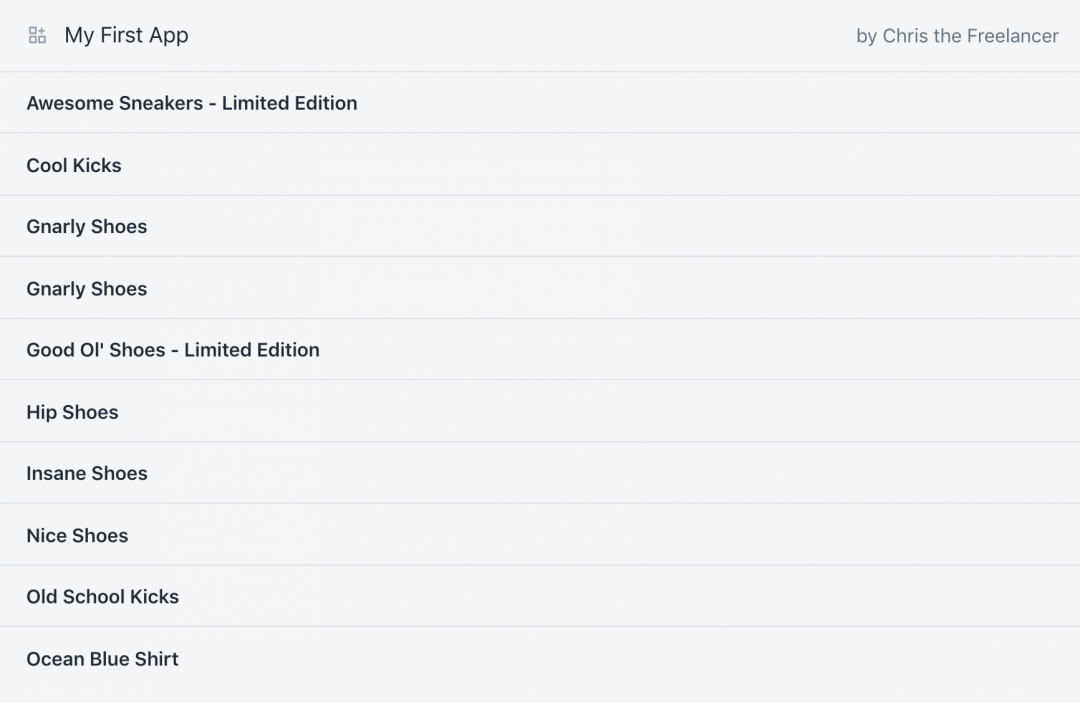
Congratulations! Your app might not be all too useful at the moment but at least you have a proof of concept and have laid the ground work to take this app in whichever direction you desire.
How to make it look native to the admin
If you're wondering about all the CSS classes in the above code, these are all from Shopify's design system called Polaris.
Included in Polaris are a bunch of components that you can model to make your app look like it is native to the Shopify admin.
Simply check out the examples in the components section of the Shopify Polaris website to see what classes can used on your elements to make them look like Shopify.
Wrapping Up
This might seem like a relatively short tutorial for such a giant topic but given the infinite options that come with building Shopify apps, it's near impossible to create a conclusive guide.
After all, a 'Shopify App' is just a web app that connects to a Shopify store to access and manipulate that store's data.
And, as we all should know, there are many different ways to build a web app.
Other things to consider when building your app include what front-end framework you will use, how you will combine Shopify data with data from other APIs (if required) and how you intend to style your app.
These are all important factors if you wish to create a production ready app.
The main things to remember about Shopify app development specifically however, are the core points mentioned at the start of this article.
- Shopify apps must be authorised by a store
- Shopify apps must be hosted somewhere, and
- Shopify apps must use utilise a Shopify API
Other than that, it's totally up to you how you build your app.
Happy coding and I'll catch you next time.
Chris