How to Build a Fully Custom Shopify Store using the Storefront API
Chances are, if you've ever built a store on Shopify, you've used at theme.
A theme is what most merchants use to build and/or customise their storefront when using the Online Store sales channel in Shopify.
You may not be aware that Shopify is much much more than just a place to build an online store. Shopify is actually a fully featured eCommerce platform that allows you to sell in many different sales channels whether it be through POS, through existing online platforms or through your own custom storefront using the Storefront API.
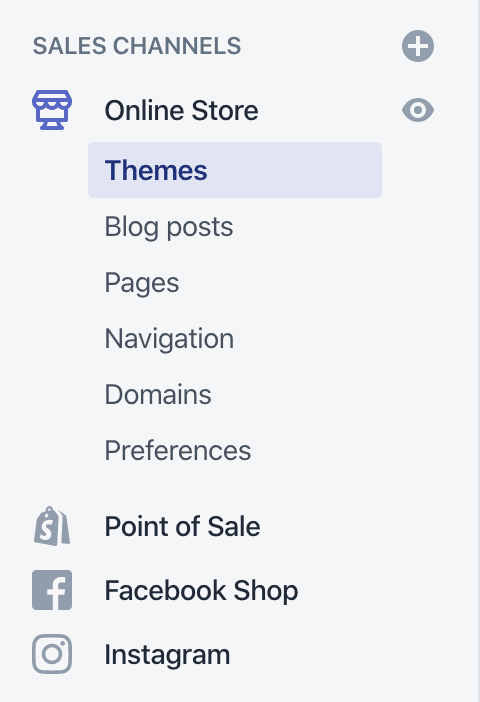
When you click on the menu item for Online Store you may have noticed that the link is sitting underneath the heading SALES CHANNELS alongside a range of other possible options such as Point of Sale, Facebook Shop and Instagram.
The Storefront API is yet another sales channel that you can use to present your store data (including products, pages and blog posts) in an infinite number of ways.
One of the ways you can utilise this API is to create your own fully-custom storefront.
Why use the Storefront API (over a theme)?
Good question!
For most merchants, the limitations of the Online Store sales channel are not an issue but for those that need a more custom setup, it may require them to set up a store outside of Shopify's servers.
Using the Storefront API, you can access all the data that would normally be presented using a Shopify theme and use it however you like.
The possibilities of how you use that data are virtually endless but in this article, I'm gonna focus on using the Storefront API to create your own custom storefront.
The Storefront API: How it works
Before we jump into the steps, I think it's important to provide a quick overview of how the Storefront API operates.
Firstly, the Storefront API can only be accessed using GraphQL.
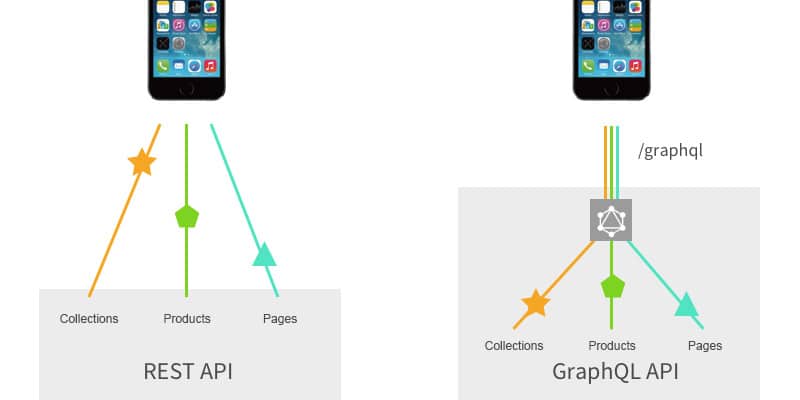
If you've done work with APIs in the past, it's likely that you've used the REST protocol. Using REST, you would simply send a GET request to a specific endpoint (url) to retrieve a certain set of data. Or, if your intention was to manipulate data on the server side, you would use a POST request.
In GraphQL however, every request you send to an API will be a POST request because in GraphQL, you send a 'query' to a single endpoint and that query determines what data you receive back instead of the specific endpoint.
It might sound a little tricky but once you get your head around GraphQL, you'll realise it makes a lot of sense to have a single endpoint and have full control over what data is returned in every request.
For example, let's say you just want to retrieve the name of your shop. Well, if the Storefront API was a REST API, you'd have to request the whole Shop object (which has 9 properties) instead of just the one property you needed, shop.name.
I highly recommend that you head to the 'Getting Started' page for the Storefront API and view the examples.
Here's a basic one:
{
    shop {
    	name
        primaryDomain {
        	url
            host
        }
    }
}
The above code will return the name of your shop as well as url and host of the primary domain.
Again, I highly recommend that you head to the API's 'Getting Started' page and read up on GraphQL in general as you will need to learn it in order to leverage the Storefront API.
Step 1: Generate an access token
In order to access your store's data through the API, you'll need to create a private app inside your Shopify store and click on the checkbox to generate a Storefront API access token.
The process looks like this:
- Click on 'Apps' in your admin sidebar
- Click on 'Manage private apps'
- Click on the button for 'Create a new private app'
- Add in an app name and email (the name can simply be 'Storefront API')
- Check the checkbox for 'Allow this app to access your storefront data using the Storefront API'
- Click 'Save'
After the app is created scroll down until you see the Storefront Access Token available in the last field. This token is all you need to start using the API.
Step 2: Make your first request
Now that you have your Storefront API access token, you can start making requests to the API.
Given that we're creating a custom Shopify storefront, we can be quite sure that we will want to retrieve data like collections, products and variants as well as be able to create a cart and submit it to Shopify.
To see what data is available, you can head to the official API documentation on Shopify's website but let's start by writing a very basic query.
{
    shop {
    	name
    }
}
As you can see, this query is quite minimal. All it does is access the shop object on the query root and then the name property within it.
The more challenging part in this case is the other settings in the request such as the url and the headers.
If you'd like to see a run-through using Javascript, checkout lesson 10 on my Skillshare class "Shopify Theme Programming: Liquid, JSON and Javascript".
The below example (taken from that tutorial) takes the query above and loads it into the JS function apiCall().
const query = `{ shop { name } }`;
function apiCall(query) {
	return fetch('[Your Shopify store address]/api/graphql.json',
    	{ method: 'POST',
          headers: { 'Content-Type': 'application/graphql',
                     "Access-Control-Origin": "*",
                     'X-Shopify-Storefront-Access-Token': "[Your storefront access token]"
                   },
          "body": query })
          .then(response =>; response.json()); }
apiCall(query).then(response => { console.log(response) });
Go ahead and replace [Your Shopify store address] and [Your storefront access token] with the url and Storefront API key of your store, head to any page within your store, throw the code into the JS console of your browser and hit enter.
Congrats! You've just made your first request to the Storefront API!
Step 3: Build your custom storefront
Now that you've successfully made your first request to the API, it's time to take that data that you've learned to retrieve and start using it in a real world way.
Unfortunately, building a fully featured web app is a huge topic that I won't cover specifically in this article but what I will do is show you how to get started building with no framework or server, just Vanilla HTML, CSS and JS.
What I've done is create a barebones custom storefront app (using just jQuery) and uploaded the code to Github at github.com/christopherdodd/shopify-storefront-api-example.
In order to "run" the app, all you need to do is drag the index.html file directly into your browser.
As you can see, very barebones.
But never fear because next, we're gonna update the app.js file with a function that we will use to render the first 20 products of our store onto the page.
Currently our app.js looks like this.
// This is our apiCall function that is pre-configured to take just the // one argument (the query) and return a response from the API function
apiCall(query) {
	return fetch('[Insert store address here]/api/graphql.json',
    	{
            method: 'POST',
            headers: {
                'Content-Type': 'application/graphql',
                'X-Shopify-Storefront-Access-Token': "[Insert your Storefront API access token here]"
            },
            "body": query
    })
    .then(response => response.json());
}

// Here is where we will take the response and render it to the page
$(document).ready(function() { const $app = $('#app'); });
Request data using Queries
What we're going to do now is add a function after the apiCall function which we'll use to bundle the request settings with a specific query in order to return a response from the Storefront API.
The function looks like this:
function getProducts() {
	const query = `{ products(first: 20) { edges { node { title description images(first: 1) { edges { node { altText transformedSrc(maxWidth: 400, maxHeight: 400) } } } } } } }`;
    return apiCall(query);
}
Next, we'll invoke this function and use the response we get back from the API to display a list of products from our store along with a product image and description.
$(document).ready(function() {
	const $app = $('#app');
    getProducts().then(response => {
    	$app.append("<div class='products'></div>");
        const $products = $('.products');
        response.data.products.edges.forEach(product => {
        	const template = `<div class="product"> <h2>${product.node.title}</h2> <img alt="${product.node.images.edges[0].node.altText}" src="${product.node.images.edges[0].node.transformedSrc}"> <p>${product.node.description}</p> </div>`;
          	$products.append(template);
         });
     });
 });
The getProducts() function returns a promise which we then chain a .then() method on to handle the response from the server.
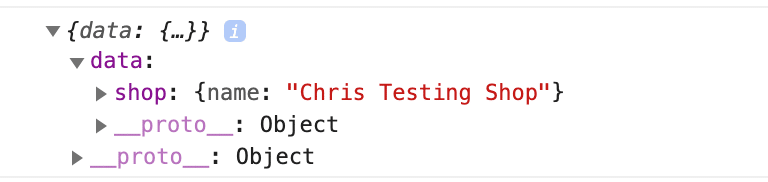
It's recommended that you insert a console.log(response); somewhere within the .then() method to actually see the data that is returned from the store. If there are any errors, you can check the 'Network' tab and the 'Console' tab of your browser's devTools to inspect and debug.
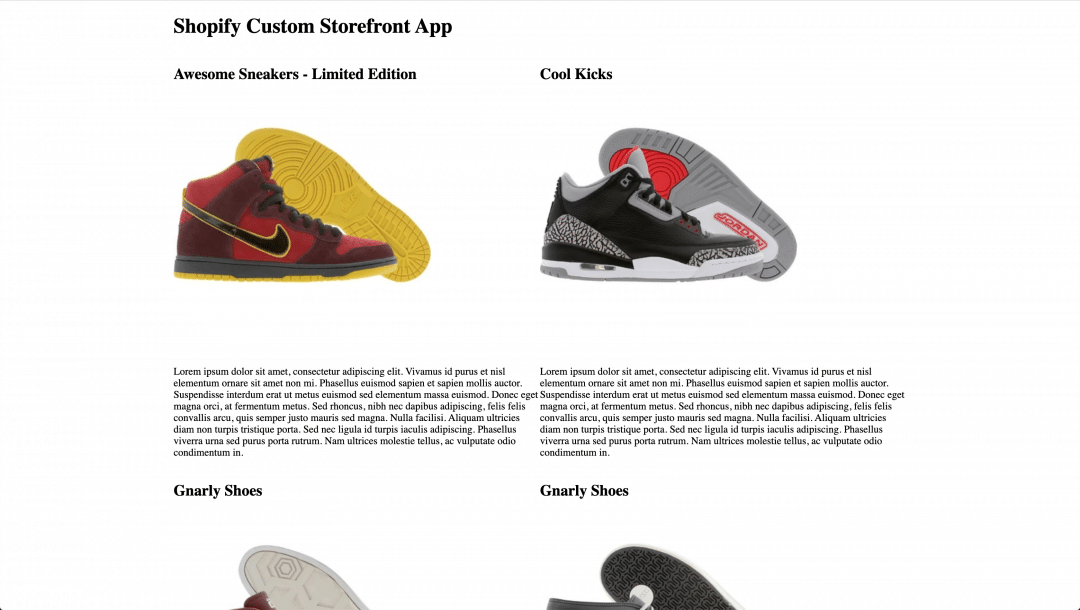
Otherwise, the above should have loaded the first 20 products of your store onto the web page and be looking a little something like this:
Congrats! You've now:
- Authenticated your request using the access token
- Constructed a GraphQL query and sent it to your store, and then
- Taken the response of that API call and rendered the data to your page using Javascript
I know this is super basic but the idea is that you continue to write queries, put them into functions and continuing rendering more content to the page.
Manipulate store data using Mutations
Most of the time, when working with the Storefront API, you'll simply be accessing data from your store via queries however there are a few instances where you might want to run a 'mutation'.
A mutation is like a query except that you use it manipulate data instead of retrieving it.
Unlike the Admin API, the Storefront API is lightly authenticated and doesn't provide many options for manipulating store data. It's basically only the checkout and the customer objects that you can manipulate but I still wanted to mention this as it's an important part of any GraphQL API.
Here is an example of a mutation you might want to run as part of your custom storefront app.
function logInUser(email, password) {
	const mutation = `mutation { customerAccessTokenCreate(input: {email: "${email}", password: "${password}"}) { customerAccessToken { accessToken, expiresAt }, customerUserErrors { code } } }`;
    return apiCall(mutation);
}
As you can read from the name of the function, you can use this to log in a customer via an 'input object' with the customer's email and password that is sent to the API (via customerAccessTokenCreate on line 3) . The API will then return back the token (line 5) as well as any errors (line 9).
My custom storefront
My custom storefront project is created using a Vue.js and Express tech stack.
The app can be accessed at the address shopify-custom-storefront.herokuapp.com and allows anyone to connect their own store as long as they provide a Storefront API access token (as demonstrated above).
For your own app, you need to decide what framework you feel most comfortable with and go with that.
While this article has covered the basic steps, I wouldn't recommend using jQuery to build full-scale web apps. Instead, I would recommend that you use an app development framework like Ruby on Rails, Vue, React or whatever else your most comfortable with (it doesn't have to be Javascript framework).
In terms of leveraging the Storefront API though, the main thing you need to understand is the basics of how it works. Study the documentation on Shopify's website and experiment with retrieving different bits of store data. Get comfortable with writing GraphQL queries and observe what comes back.
The possibilities of how you utilise the data are endless.
Happy coding and I’ll catch you next time.
Chris